http://DeepLearning101.TWMAN.ORG
這篇年代有點久遠,陸續有不少更新,請改參考以下連結或更多文章
https://github.com/Deep-Learning-101
https://huggingface.co/DeepLearning101
https://github.com/Deep-Learning-101
https://huggingface.co/DeepLearning101
2016/06 自己添購(開箱) GIGABYTE GTX 960 4G * 2
2017/01 自己添購(開箱) 技嘉GTX1080 XTREME GAMING 8G
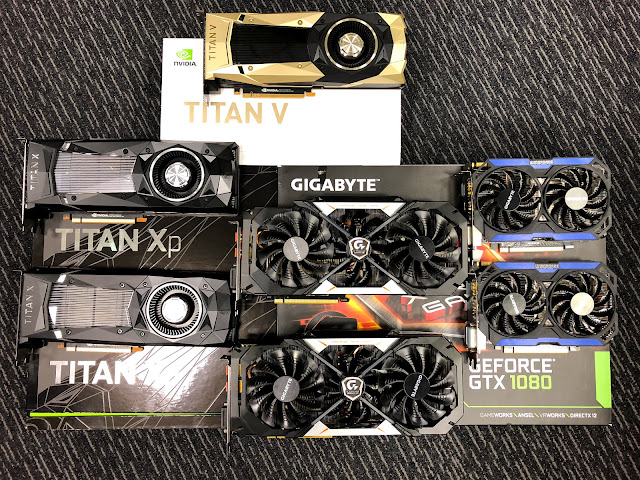
2018/05 公司投資添購(開箱) NVIDIA TITAN V + NVIDIA TITAN XP
2023/08 公司添購 RTX 6000 Ada 48 GB * 2 和 A 100 80GB * 4
2023/08 公司添購 RTX 6000 Ada 48 GB * 2 和 A 100 80GB * 4
2024/05 公司添購RTX 6000 Ada 48 GB * 8 * 2
UPDATE !!! 更新超方便的 nVIDIA Cloud 的安裝設定記錄在最底部 !!!
翻翻我過往的開箱文就知道,搞研究我一向是工欲善其事必先利其器兼廢寑忘食 !
[開箱] 技嘉GTX1080 XTREME GAMING 8G + Gigabyte X99P SLI + Intel XEON E5 2620 v4 + MICRON DDR4 128GB
不過今天開箱是要 謝謝老闆 姑且不提這幾年,我自己投入多少金額在自己的研究 ... XD
這是天上掉下來的一個做夢都會傻笑的研究環境啊,跪謝老闆啊 ...
但歡迎參考一下目前累積的成果: http://DeepLearning101.TWMAN.ORG (以後不能嘴砲了)
但歡迎參考一下目前累積的成果: http://DeepLearning101.TWMAN.ORG (以後不能嘴砲了)
這應該算是這次開箱有點重要又不太重要的轉接卡了,因為再大的主機板也很難同時塞下 3張超大的 GPU 啊 !
至於硬碟 !!! 猶記得在 2003 還 2005 可是以把 500GB 組成 10 TB 為目標呢,想不到現在直接一顆 10 TB ... 但其實一直以來我的硬碟數量都不比一般人少就是


痛痛的人生@我的最愛 - 我的電腦 和 硬碟
WD【金標】10TB 3.5吋企業級(氦氣)硬碟(WD101KRYZ) ($15490)
CORSAIR海盜船 RM1000X 80Plus金牌 1000W電源供應器 ($5990)
再來則是 1000W 的超級大 POWER 了

配線整個就是超豐富的
NVIDIA TITAN V 顯示卡 ($97990)
剛拿到手時, 一瞬間金光閃閃 ~ 整個人的心情簡直就是天外飛仙
這卡我就不多加介紹到底有多強了 ... 相信網路上已經很多介紹文
只是比較囧的是,還是碰到驅動程式無法識別的 "Graphics Device" 問題 ...
Ubuntu 14.04, NVIDIA Driver 387.34 ... 打算裝 16.04 但忘記當初 16.04 好像有啥問題
多虧這個 nvidia 的官方論壇 ... 剛好有新版的 390.25 的驅動 !

http://www.nvidia.com.tw/download/driverResults.aspx/128119/tw
所以要先移除,然後會因此碰上一些缺失的部份,所以得注意整個過程 !
https://blog.csdn.net/yusiguyuan/article/details/24269129
https://www.ubuntu-tw.org/modules/newbb/viewtopic.php?post_id=318768
https://www.ubuntu-tw.org/modules/newbb/viewtopic.php?post_id=318768
Sub-process /usr/bin/dpkg returned an error code
mv /var/lib/dpkg/info /var/lib/dpkg/info.bak
mkdir /var/lib/dpkg/info
apt-get update
apt-get -f install cuda-drivers
mv /var/lib/dpkg/info/* /var/lib/dpkg/info.bak
rm -rf /var/lib/dpkg/info
mv /var/lib/dpkg/info.bak /var/lib/dpkg/info
然後可以再補一下這個,整個把 driver 清空就是
apt-get remove cuda-driver
apt-get autoremove
如果是出現 相依關係: xxxx 但它卻將不會被安裝 可以這樣做
sudo apt-get install aptitude
sudo aptitude -y clean
sudo aptitude -y autoclean
sudo apt-get -y autoremove
sudo aptitude -y update
sudo aptitude -f -y install
sudo dpkg --configure -a
sudo aptitude -y full-upgrade
sudo apt-get -y check
因 apt-get 與 aptitude 使用不同的記錄檔,如果曾用過 dpkg 或 aptitude 指令,以後要再安裝 新套件 或 更新已安裝套件,最好使用 aptitude
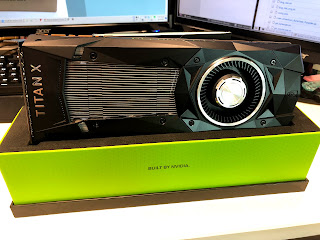
至於這個則是同事佛心提供的 TITAN XP * 8 的機器 !!!
另外就是如果 nvidia-smi 沒有在一瞬間跳出結果的話,可以注意這個
nvidia-smi -i 0 -pm ENABLED
nvidia-smi -i 0 -q | grep Persistence
雖然我也訂購了兩張,但 4/30 都還缺貨,5/1 一到貨居然馬上就完售 !
NVIDIA TITAN XP 顯示卡 * 2 ($39990 * 2)
https://24h.pchome.com.tw/prod/DRADA1-A90086EUY
NVIDIA TITAN XP 顯示卡 * 2 ($39990 * 2)
https://24h.pchome.com.tw/prod/DRADA1-A90086EUY
這是天上掉下來的一個做夢都會傻笑的研究環境啊,跪謝老闆 ...
但好像該手刀快點到 PCHOME 24H 買台電風扇才對 !
2018/05/29 更新 .... TITAN XP * 1 到貨
最後,估計這幾天可就有得忙了 ... 好險手邊的專案也勉強算告一段落就是 !
UPDATE !!! 更新超方便的 nVIDIA Cloud 的安裝設定記錄在最底部 !!!
如果你也曾經自己動手處理安裝問題,基本上都會碰到一堆怪問題
這邊先附上我碰到的,然後最後放上我選擇的解決方法 !
原因: 這個有點忘記是怎樣弄出來的了 ! XD
問題: "No module named locale" python
解法: apt-get install --reinstall python2.7
-----
原因: 編譯 cafe 時
問題: /usr/local/cuda/include/crt/common_functions.h:64:24: error: token
解法: vi /usr/local/cuda/include/crt/common_functions.h
註解掉這行
#define __CUDACC_VER__ "__CUDACC_VER__ is no longer supported. Use __CUDACC_VER_MAJOR__, __CUDACC_VER_MINOR__, and __CUDACC_VER_BUILD__ instead."
-----
原因: 編譯 pycafe 時
問題: python/caffe/_caffe.cpp:10:31: fatal error: numpy/arrayobject.h: 沒有此一檔案或目錄
解法: 註解這行 #include <numpy/arrayobject.h>
如果还是不行,可以试试:
import numpy as np
np.get_include()
得到:
/usr/local/lib/python2.7/dist-packages/numpy/core/include
在Makefile.config找到PYTHON_INCLUDE,发现有点不同:
PYTHON_INCLUDE := /usr/include/python2.7 \
/usr/lib/python2.7/dist-packages/numpy/core/include
要加一个local,变成:
PYTHON_INCLUDE := /usr/include/python2.7 \
/usr/local/lib/python2.7/dist-packages/numpy/core/include
再make pycaffe就ok了
Ubuntu 14.04 安裝 ssh
apt-get install aptitude
apt-get install openssh-server
/etc/init.d/ssh restart
解決nvidia顯卡開機黑畫面
vi /etc/default/grub
找到下面這行
GRUB_CMDLINE_LINUX_DEFAULT="quiet splash"
並且修改為
GRUB_CMDLINE_LINUX_DEFAULT="quiet splash nomodeset"
儲存後離開下這指令
update-grub
裝nvidia顯卡驅動
要先在本機端前進 cmd 模式,停止 lightdm (記得要自己下載好檔案)
/etc/init.d.lightdm stop
裝NVIDIA驅動
./NVIDIA-Linux-x86_64-390.25.run
裝CUDA
./cuda_9.1.85_387.26_linux.run
裝 vnc 且含桌面
aptitude install tightvncserver xrdp vnc4server gnome-core ubuntu-desktop -y
裝好後,先 vncserver :1 然後輸入兩次密碼,接著關掉它 vncserver -kill :1 然後再編輯 ~/.vnc/xstratup 這個檔案內容如下
---
#!/bin/sh
export XKL_XMODMAP_DISABLE=1
unset SESSION_MANAGER
unset DBUS_SESSION_BUS_ADDRESS
[ -x /etc/vnc/xstartup ] && exec /etc/vnc/xstartup
[ -r $HOME/.Xresources ] && xrdb $HOME/.Xresources
xsetroot -solid grey
vncconfig -iconic &
gnome-session &
gnome-panel &
gnome-settings-daemon &
metacity &
nautilus &
gnome-terminal &
vncconfig -nowin &
但是這個動作還蠻常不知為啥,vnc 登入後會 ubuntu 桌面就是出不來,所以可以再試試
apt-get install xfce4,然後把 ~/.vnc/xstartup改成以下這樣
#!/bin/sh
# Uncomment the following two lines for normal desktop:
# unset SESSION_MANAGER
# exec /etc/X11/xinit/xinitrc
[ -x /etc/vnc/xstartup ] && exec /etc/vnc/xstartup
[ -r $HOME/.Xresources ] && xrdb $HOME/.Xresources
xsetroot -solid grey
vncconfig -iconic &
x-terminal-emulator -geometry 80x24 10 10 -ls -title "$VNCDESKTOP Desktop" &
#x-window-manager &
sesion-manager & xfdesktop & xfce4-panel &
xfce4-menu-plugin &
xfsettingsd &
xfconfd &
xfwm4 &
修改完後建議重開機,最後再用這行指令啟動
vncserver -geometry 1280x1024 -depth 16 -dpi 150 :1
這個錯誤是當我已經另外自己在 ubuntu 14.04 上編譯 python 2.7.13 後,要用 pip 安裝東西時的問題: pip is configured with locations that require tls/ssl
解決方法是: apt-get install openssl
然後修改 python 新的源碼裡的 Modules/Setup 檔案裡,下面的 # 給註解掉,然後重新 make 跟 make install 就可以了
# Socket module helper for socket(2)
# _socket socketmodule.c timemodule.c
# Socket module helper for SSL support; you must comment out the other
# socket line above, and possibly edit the SSL variable:
# SSL=/usr/local/ssl _ssl _ssl.c \
# -DUSE_SSL -I$(SSL)/include -I$(SSL)/include/openssl \
# -L$(SSL)/lib -lssl -lcrypto
apt-get install libssl-dev
apt-get install libcurl4-openssl-dev
apt-get install phantomjs
pip install pyspider
搞定 !
但是這個動作還蠻常不知為啥,vnc 登入後會 ubuntu 桌面就是出不來,所以可以再試試
apt-get install xfce4,然後把 ~/.vnc/xstartup改成以下這樣
#!/bin/sh
# Uncomment the following two lines for normal desktop:
# unset SESSION_MANAGER
# exec /etc/X11/xinit/xinitrc
[ -x /etc/vnc/xstartup ] && exec /etc/vnc/xstartup
[ -r $HOME/.Xresources ] && xrdb $HOME/.Xresources
xsetroot -solid grey
vncconfig -iconic &
x-terminal-emulator -geometry 80x24 10 10 -ls -title "$VNCDESKTOP Desktop" &
#x-window-manager &
sesion-manager & xfdesktop & xfce4-panel &
xfce4-menu-plugin &
xfsettingsd &
xfconfd &
xfwm4 &
修改完後建議重開機,最後再用這行指令啟動
vncserver -geometry 1280x1024 -depth 16 -dpi 150 :1
---
用pip安装 提示找不到ssl模块
解決方法是: apt-get install openssl
然後修改 python 新的源碼裡的 Modules/Setup 檔案裡,下面的 # 給註解掉,然後重新 make 跟 make install 就可以了
# Socket module helper for socket(2)
# _socket socketmodule.c timemodule.c
# Socket module helper for SSL support; you must comment out the other
# socket line above, and possibly edit the SSL variable:
# SSL=/usr/local/ssl _ssl _ssl.c \
# -DUSE_SSL -I$(SSL)/include -I$(SSL)/include/openssl \
# -L$(SSL)/lib -lssl -lcrypto
Ubuntu10.04下 编译opensll代码出錯 " error: openssl/rsa.h: No such file or directory "
apt-get install libssl-dev
pip 安裝 pyspider 時出現 Could not run curl-config [Errno 2] No such file or directory
apt-get install libcurl4-openssl-dev
apt-get install phantomjs
pip install pyspider
搞定 !
-----
其實還會碰上很多很奇怪的問題 ... 像是 cuda 9.1 + cudnn 7.1 編譯 caffe 時,總是不能抓到 TITAN V,或者是 cuda 8.0 + cudnn 7.1 也是會有編不過的問題
很容易讓人整個暴燥起來 ... 最後我想起了 docker 和nVIDIA Cloud
首先是要先安裝 docker,這兩個指令就可以搞定
sudo apt-get install curl
curl -sSL https://get.docker.com | sudo sh
# curl -s -L https://nvidia.github.io/nvidia-docker/gpgkey | sudo apt-key add -
distribution=$(. /etc/os-release;echo $ID$VERSION_ID)
# curl -s -L https://nvidia.github.io/nvidia-docker/$distribution/nvidia-docker.list | sudo tee /etc/apt/sources.list.d/nvidia-docker.list
# curl -s -L https://nvidia.github.io/nvidia-docker/$distribution/nvidia-docker.list | sudo tee /etc/apt/sources.list.d/nvidia-docker.list
# apt-get update
# apt-get install nvidia-docker2
安裝 nvidia-container-runtime
(https://github.com/nvidia/nvidia-container-runtime#docker-engine-setup)
(https://github.com/nvidia/nvidia-container-runtime#docker-engine-setup)
apt-get install nvidia-container-runtime
service docker restart
修改 docker image 存放的資料夾還有設定 docker-container-runtime (視自己需求)
vi /etc/docker/daemon.json
{
"graph": "/Research1/docker-data",
"storage-driver": "overlay",
"runtimes": {
"nvidia": {
"path": "/usr/bin/nvidia-container-runtime",
"runtimeArgs": []
}
}
}
docker login nvcr.io
Username: $oauthtoken
Password: <Your Key>
這時就可以下載 docker image 了,裡面有各式 framework 的 docker image,視自己需求哦
# docker pull nvcr.io/nvidia/digits:18.04
接著就是啟用的方法,網路上有很多啟動的指令使用說明
nvidia-docker run --name digits -d -p 8888:5000 -v /home/username/data:/data:ro -v /home/username/digits- jobs:/workspace/jobs nvcr.io/nvidia/digits


